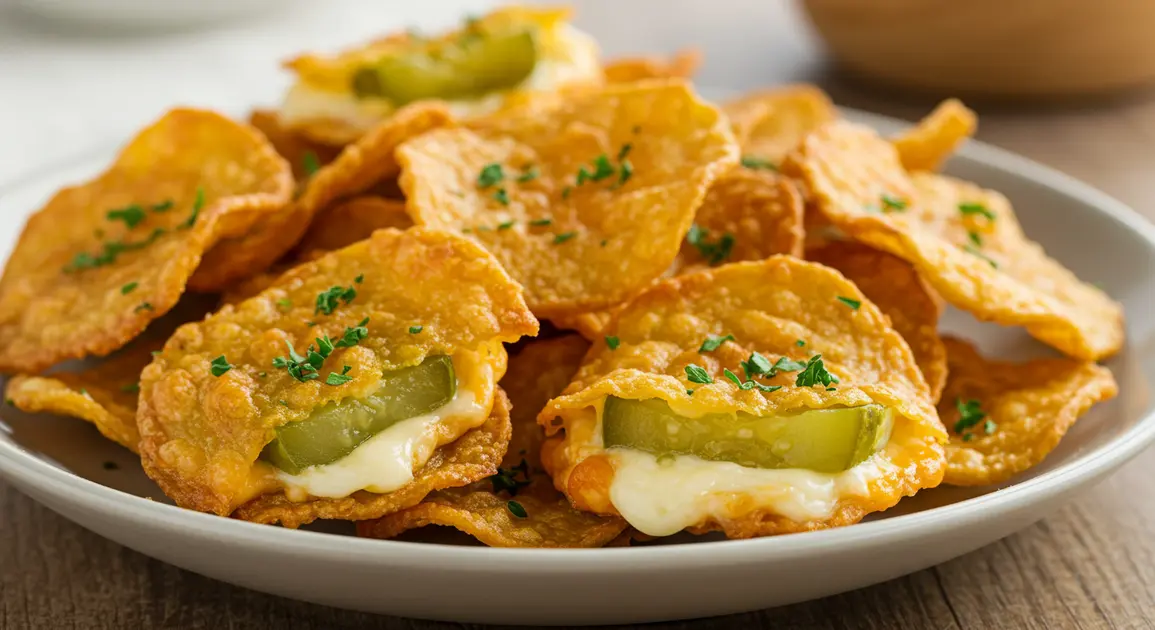
Crunchy & Cheesy Pickle Chips: The Must-Try Snack Recipe of the Year!
A perfect blend of tangy dill pickles and savory cheese creates an irresistible low-carb snack that’s taking the culinary world by storm. Learn how to make these addictive cheesy pickle chips at home with our foolproof recipe and expert tips.
Table of Contents
Introduction: The Unexpected Snack Sensation
When it comes to satisfying cravings, few combinations hit the spot quite like the pairing of tangy pickles and melted cheese. The contrast between the sharp, briny flavor of dill pickles and the rich creaminess of cheese creates a taste experience that’s simultaneously familiar and exciting. Cheesy pickle chips have emerged as a trending snack option for those seeking something different from traditional potato chips or crackers.
What makes these chips truly special is their versatility. They work beautifully as a low-carb snack option, a unique party appetizer, or even as a flavorful garnish for soups and salads. Whether you’re following a keto lifestyle, looking for gluten-free alternatives, or simply wanting to experiment with new flavors in your kitchen, these cheesy pickle chips deserve a place in your recipe collection.
In this comprehensive guide, I’ll walk you through everything you need to know to create perfect cheesy pickle chips at home. From selecting the right ingredients to mastering the techniques that ensure crispy, flavorful results every time, you’ll soon be enjoying this addictive snack that’s as fun to make as it is to eat.
Why Cheesy Pickle Chips Are Worth Making
Before diving into the recipe, let’s talk about why these chips have gained such popularity:
- Low-carb alternative: With virtually no carbohydrates, these chips are perfect for keto and low-carb diets.
- Simple ingredients: You only need a few basic items that you likely already have in your refrigerator.
- Quick preparation: From start to finish, you can have these ready in under 30 minutes.
- Customizable: Easy to adapt with different cheese varieties and seasonings to suit your taste preferences.
- Crowd-pleaser: They make an unexpected and impressive appetizer for gatherings.
Ingredients You’ll Need
To make approximately 24 cheesy pickle chips, gather the following ingredients:
- 2 large dill pickles (kosher or Polish varieties work best)
- 1½ cups shredded sharp cheddar cheese (or a mixture of cheddar and parmesan)
- ½ teaspoon garlic powder
- ½ teaspoon dried dill
- ¼ teaspoon paprika (regular or smoked)
- ¼ teaspoon black pepper
- Optional: pinch of cayenne pepper for heat
- Optional: 2 tablespoons grated parmesan cheese for extra crispiness
Equipment Needed
- Cutting board
- Sharp knife
- Paper towels
- Baking sheet
- Parchment paper or silicone baking mat
- Small mixing bowl
- Measuring spoons
- I use affiliate links that give me a small commission, no additional cost for you.
- Affiliate links help support my work without affecting your price.
Preparation: Setting Up For Success
- Preheat your oven to 400°F (200°C). This high temperature helps achieve the perfect crispy texture while melting the cheese quickly.
- Prepare your baking sheet by lining it with parchment paper or a silicone baking mat. This prevents sticking and makes cleanup easier.
- Mix your seasonings in a small bowl, combining the garlic powder, dried dill, paprika, black pepper, and cayenne pepper (if using). Having this spice blend ready will ensure even distribution of flavors.
Step-by-Step Instructions
Step 1: Prepare the Pickles
Start with pickles that are at least 1½ inches in diameter for the best results. Smaller pickles will work but may require adjusted baking times.
- Slice the pickles into rounds approximately ¼-inch thick. Aim for consistency in thickness to ensure even cooking.
- Place the pickle slices on paper towels and gently press another paper towel on top to remove excess moisture. This is a crucial step – too much moisture will prevent your cheese chips from crisping properly.
- Allow the pickle slices to drain for about 10 minutes, replacing the paper towels as needed.
Step 2: Prepare the Cheese Mixture
While your pickles are draining:
- In a bowl, combine the shredded cheddar cheese with your seasoning mixture. If using parmesan, add it now as well.
- Mix thoroughly to ensure the spices are evenly distributed throughout the cheese.
Step 3: Assemble Your Chips
- Arrange the dried pickle slices on your prepared baking sheet, leaving about 1 inch of space between each slice.
- Take approximately 1 tablespoon of the cheese mixture and form it into a small mound on top of each pickle slice. The cheese should completely cover the pickle and extend slightly beyond the edges.
- Gently press down on each cheese mound to create an even layer.
Step 4: Baking to Perfection
- Place the baking sheet in the preheated oven and bake for 7-10 minutes. Watch closely after the 7-minute mark to prevent burning.
- The chips are ready when the cheese is melted and the edges have turned golden brown and crispy.
- Remove from the oven and let cool for 2-3 minutes on the baking sheet. This allows the cheese to set slightly, making the chips easier to handle.
- Transfer to a wire rack for an additional 5 minutes of cooling. As they cool, the chips will become crispier.
Variations to Try
The beauty of cheesy pickle chips lies in their adaptability. Here are some exciting variations to experiment with:
Different Cheese Options
- Pepper Jack: Adds a spicy kick that complements the tangy pickles
- Monterey Jack: Creates a milder, stretchy texture
- Swiss: Offers a nutty flavor profile
- Gouda: Provides a rich, smoky undertone
- Blue Cheese: For adventurous palates seeking bold flavor
Seasoning Alternatives
- Ranch Seasoning: For a crowd-pleasing flavor
- Italian Herbs: Oregano, basil, and thyme create a Mediterranean twist
- Taco Seasoning: For a Tex-Mex inspired version
- Everything Bagel Seasoning: Adds texture and savory notes
- Old Bay Seasoning: Perfect for seafood lovers
Serving Suggestions
Cheesy pickle chips are delicious on their own, but they can also be elevated with dipping sauces or as components in other dishes:
- Serve with ranch dressing, chipotle mayo, or sriracha for dipping
- Use as crispy toppers for salads
- Crush slightly and sprinkle over soups as a flavorful garnish
- Include on charcuterie boards as a unique element
- Serve alongside burgers as a low-carb alternative to french fries
Troubleshooting Common Issues
Even with simple recipes, challenges can arise. Here are solutions to common problems:
Chips Not Crisping Properly
- Problem: Cheese melts but doesn’t get crispy
- Solution: Ensure pickles are thoroughly dried before adding cheese. Try extending the baking time by 1-2 minutes or increasing the oven temperature slightly to 425°F.
Cheese Burning Before Crisping
- Problem: Edges burn while center remains soft
- Solution: Lower oven temperature to 375°F and bake for a longer period. Position the rack in the middle of the oven rather than close to the heating element.
Cheese Spreading Too Much
- Problem: Cheese melts and spreads beyond the pickle
- Solution: Make sure the cheese is placed directly on top of the pickle with minimal overhang. Refrigerating the assembled chips for 5 minutes before baking can also help control spreading.
Storage and Reheating
Cheesy pickle chips are best enjoyed fresh from the oven, but if you have leftovers:
- Store in an airtight container in the refrigerator for up to 3 days.
- To reheat, place on a baking sheet in a 350°F oven for 3-5 minutes until warmed through and crisp.
- Avoid microwaving as this will make the chips soggy.
Nutritional Benefits
Beyond being delicious, cheesy pickle chips offer some surprising nutritional advantages:
- Low in carbohydrates: Perfect for those following ketogenic or low-carb diets
- Good source of protein: The cheese provides satisfying protein
- Probiotics: Fermented pickles contain beneficial probiotics
- Calcium: Cheese delivers calcium for bone health
- Electrolytes: Pickles provide sodium and potassium, important electrolytes
Conclusion: Embracing Culinary Creativity
The humble pickle and everyday cheese transform into something extraordinary in this recipe. Cheesy pickle chips represent the joy that comes from culinary experimentation and thinking outside the conventional snack box. They remind us that sometimes the most unexpected combinations create the most memorable flavors.
Whether you’re making these for a quiet night in or preparing a batch for your next gathering, these crispy, tangy, cheesy treats are sure to spark conversation and satisfy cravings. Don’t be surprised if you find yourself making double batches – they tend to disappear quickly!
I encourage you to try the basic recipe first, then have fun exploring the variations. Let your creativity guide you, and don’t hesitate to share your own unique twists in the comments below. Happy snacking!
Frequently Asked Questions (FAQs)
Can I make cheesy pickle chips in an air fryer?
Yes! Air fryers work wonderfully for this recipe. Prepare the chips as directed, then air fry at 375°F for about 5-6 minutes. Check frequently during the last minute to prevent burning.
Are cheesy pickle chips keto-friendly?
Absolutely! With minimal carbohydrates from the pickles and plenty of fat from the cheese, these chips align perfectly with ketogenic diet requirements.
Can I use sweet pickles instead of dill?
While you can use sweet pickles, the flavor profile will change significantly. The sweetness combined with cheese creates a different experience than the classic tangy dill version. If using sweet pickles, consider pairing with a more mild cheese like mozzarella.
How do I prevent my chips from becoming soggy?
The key is thoroughly drying the pickle slices before adding cheese. Press them between paper towels and allow them to drain for at least 10 minutes. For extra insurance against sogginess, you can sprinkle a thin layer of parmesan cheese directly on the baking sheet, place the pickle on top, then add your cheese mixture.
Can I make these ahead of time for a party?
These are best served fresh, but you can prepare them up to the point of baking and refrigerate the assembled but unbaked chips for up to 4 hours before your event. Then simply bake them right before serving.
What’s the best type of pickle to use?
Kosher dill or Polish dill pickles typically work best because of their firm texture and tangy flavor. Avoid using pickle spears or whole pickles that you slice yourself, as they often contain more moisture than pre-sliced pickles.
Can I make these without an oven?
If you don’t have an oven available, these can be made in a toaster oven or even in a skillet with a lid. For the skillet method, use low heat and cover to help the cheese melt, then uncover to allow the edges to crisp up.
for more recipes visit us!!!!