
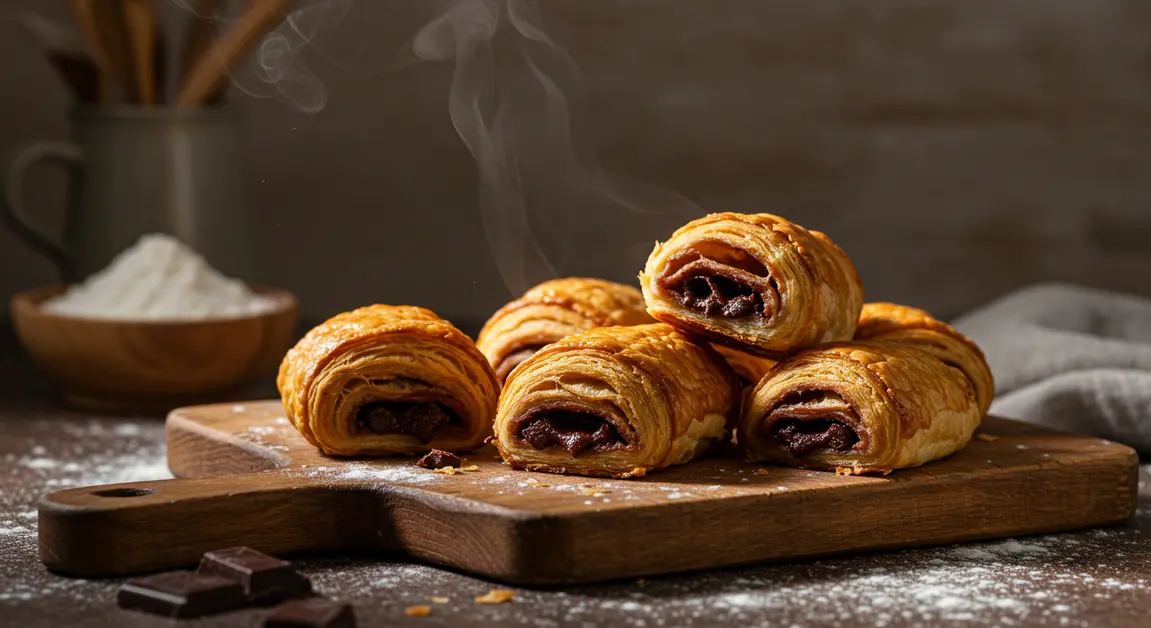
🍫 Heavenly Homemade Chocolate Pastries: The Best Guide to Flaky, Buttery Perfection
There’s something magical about the aroma of freshly baked chocolate pastries wafting through your kitchen on a weekend morning. The golden, flaky layers crackling as you take that first bite, revealing warm, melted chocolate inside – it’s pure heaven. Today, I’m sharing my treasured recipe for chocolate pastries that has been perfected through years of baking adventures and countless family breakfasts.

Table of Contents
🌟 Why These Chocolate Pastries Will Transform Your Baking
These aren’t just any ordinary chocolate pastries. Through careful technique and patience, we create layers upon layers of buttery, flaky dough that rivals any French patisserie. The secret lies in the lamination process, a technique that might seem intimidating at first, but I promise you, once you master it, you’ll feel like a true pastry chef.
What makes this recipe special is its approachability. While the technique is professional-grade, I’ve broken it down into manageable steps that any home baker can follow. The result? Chocolate pastries that will have your family and friends convinced you’ve secretly trained in a Parisian bakery.
🎯 What Makes This Recipe Work
- Perfect lamination technique creates those coveted flaky layers
- Temperature control ensures butter doesn’t melt during folding
- Proper rising time develops incredible flavor and texture
- Quality chocolate makes all the difference in taste
- Professional shaping methods give bakery-worthy presentation
🛠️ Equipment Needed
- Large mixing bowl
- Kitchen scale (highly recommended for accuracy)
- Rolling pin (preferably marble or wooden)
- Sharp knife or pizza cutter
- Baking trays
- Parchment paper
- Pastry brush
- Clean kitchen towels
- Measuring cups and spoons
- Stand mixer (optional, but helpful for kneading)
🥧 Ingredients Breakdown
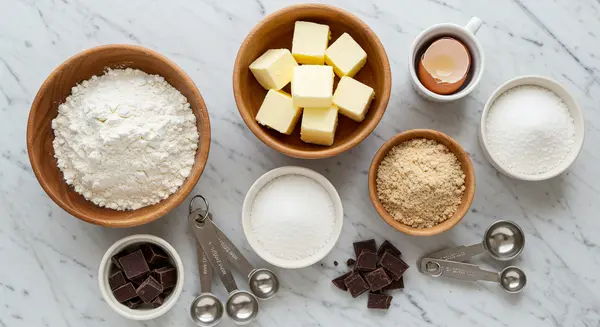
For the Base Dough:
- 6 cups all-purpose flour (the foundation of our pastry)
- 2 tablespoons butter, softened (adds initial richness)
- 4 tablespoons granulated sugar (provides subtle sweetness)
- ½ teaspoon salt (enhances all flavors)
- 1 tablespoon active dry yeast (creates the perfect rise)
- Warm water as needed (brings everything together)
For the Lamination:
- 250g butter, softened but not melted (creates those flaky layers)
For the Chocolate Filling:
- High-quality chocolate, chopped or chocolate spread (the star of the show)
👨🍳 Step-by-Step Preparation Guide
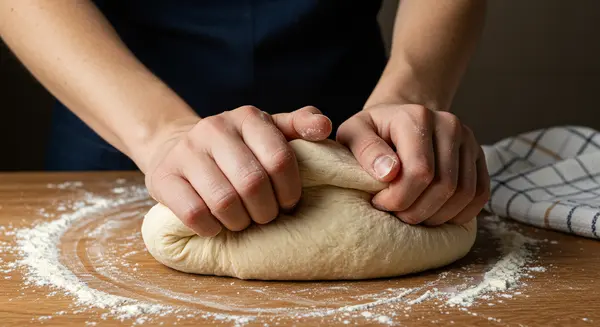
Creating the Perfect Base Dough
The journey to exceptional chocolate pastries begins with a well-developed dough. In your large mixing bowl, combine the flour, sugar, salt, and yeast. This dry mixture is the canvas for our masterpiece. The key here is ensuring your yeast is fresh and active – if you’re unsure, proof it in a small amount of warm water with a pinch of sugar before adding.
Incorporate the softened butter by rubbing it into the dry ingredients until the mixture resembles coarse breadcrumbs. This initial fat incorporation helps create tenderness in the final pastry. Gradually add warm water while kneading – the amount will vary depending on humidity and flour type, so add slowly until you achieve a smooth, elastic dough.
Knead for 7-10 minutes until the dough is silky and springs back when poked. This develops the gluten structure that will support all those beautiful layers we’re about to create. Cover and let rise in a warm, draft-free place until doubled – this usually takes 1 to 1½ hours.
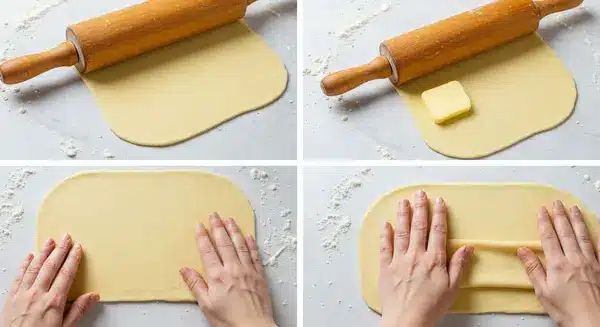
Mastering the Lamination Process
Here’s where the magic happens. Lamination is the technique that creates those incredible flaky layers you find in croissants and Danish pastries. Once your dough has risen beautifully, turn it out onto a lightly floured surface and roll it into a large rectangle.
The butter for lamination should be soft and pliable but not melted – think of the texture of soft cheese. Slice your 250g of butter thinly and arrange it over two-thirds of your rolled dough. This is called the “butter block.”
Now comes the first fold: take the third of the dough without butter and fold it over the middle third, then fold the buttered section over the top. You’ve just created your first set of layers! Rotate the dough 90 degrees and roll it out again into a rectangle.
Repeat this folding and rolling process 2-3 more times. If you notice the butter starting to soften too much or break through the dough, don’t panic – simply refrigerate for 15-20 minutes. This temperature control is crucial for creating distinct layers.
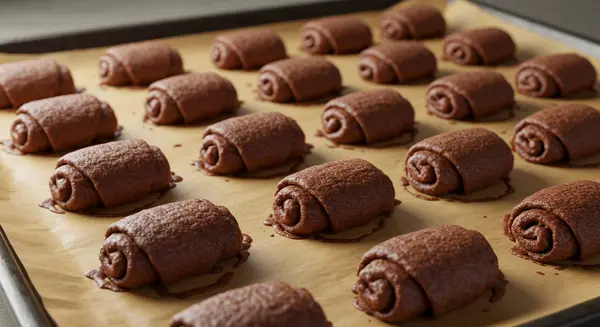
Shaping Your Chocolate Pastries
After your final lamination, roll the dough one last time into a rectangle about 3-4mm thick. The thickness is important – too thick and the pastries won’t bake evenly; too thin and you’ll lose those precious layers.
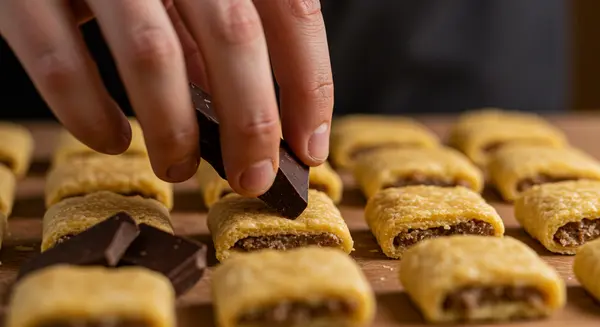
Cut your dough into rectangles or squares, depending on your preferred shape. I love making mine about 4×3-inch rectangles – they’re substantial without being overwhelming. Place your chocolate in the center of each piece. If using chopped chocolate, be generous but don’t overfill. Chocolate spread works beautifully, too and is less likely to escape during baking.
Fold the edges over the chocolate filling and shape as desired. You can create simple sealed squares, or for something more elegant, shape them croissant-style with a slight curve. The key is ensuring all edges are well-sealed to prevent chocolate from leaking out.
🔥 Baking to Golden Perfection
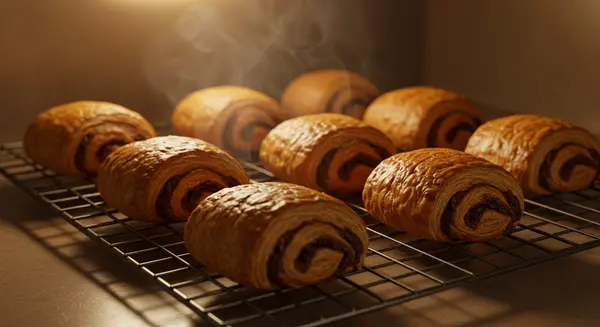
Arrange your shaped pastries on parchment-lined baking trays, leaving adequate space between each one – they’ll puff up significantly during baking. For that beautiful golden color, brush the tops with beaten egg mixed with a drop of milk. This egg wash creates that glossy, professional finish.
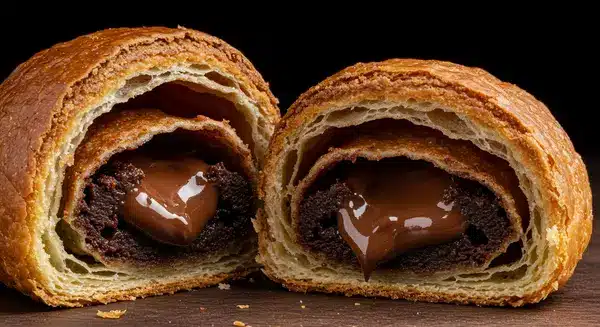
Preheat your oven to 180-200°C (356-392°F). The higher temperature is crucial for creating steam that lifts those layers. Bake for 15-20 minutes, watching carefully after 12 minutes. You want them golden brown and crispy, with layers that have separated beautifully.
💡 Pro Tips for Perfect Results
Temperature is everything – Keep your butter at the right consistency throughout lamination. Too soft and it will merge with the dough; too hard and it will break through.
Don’t skip the resting – If your dough becomes too elastic to roll, cover and let it rest for 15 minutes. This relaxes the gluten and makes rolling much easier.
Quality chocolate matters – Use the best chocolate you can afford. The flavor really shines through in the final pastry.
Egg wash technique – Apply egg wash gently and evenly. Too much will pool and burn; too little won’t give you that gorgeous color.
🍽️ Serving and Storage Suggestions
These chocolate pastries are at their absolute best served warm from the oven when the chocolate is still slightly melted and the pastry is at peak flakiness. However, they’re also delightful at room temperature and make an elegant addition to any brunch spread.
For a special touch, dust lightly with powdered sugar just before serving. They pair beautifully with fresh coffee or tea, and the contrast of the rich chocolate with a slightly bitter espresso is absolutely divine.
Store leftover pastries in an airtight container for up to 2 days. To refresh them, warm in a 300°F oven for 5-7 minutes to restore some of that original crispiness.
🔄 Variations and Customizations
Once you’ve mastered the basic technique, the possibilities are endless. Try different chocolate fillings like dark chocolate with orange zest, or milk chocolate with chopped nuts. For a more decadent version, add a small spoonful of chocolate hazelnut spread along with the chopped chocolate.
You can also experiment with shapes – twist them into braids, create pinwheels, or make mini versions for elegant afternoon tea presentations.
📊 Nutritional Benefits
While these are certainly an indulgent treat, they do offer some nutritional value. The laminated dough provides carbohydrates for energy, while the chocolate contributes antioxidants and minerals like magnesium and iron. The key, as with all wonderful things, is enjoying them in moderation as part of a balanced lifestyle.
🎉 Why This Recipe Works Every Time
The success of this recipe lies in understanding the science behind each step. The yeast dough provides structure and flavor development, while the lamination creates texture. The temperature control ensures proper layer formation, and the high baking heat creates the steam necessary for lift.
This isn’t just a recipe – it’s a technique that, once mastered, opens the door to countless pastry possibilities. Every fold of the dough, every careful temperature check, every patient moment of rising time contributes to the final magical result.
📞 Frequently Asked Questions
Q: Can I make the dough ahead of time? A: Absolutely! After the first rise, you can refrigerate the dough overnight before beginning the lamination process. This actually improves the flavor development.
Q: What if my butter breaks through the dough during lamination? A: Don’t worry! Simply patch any holes with a light dusting of flour and continue. If it happens frequently, your butter might be too cold or your dough too warm.
Q: Can I freeze these pastries? A: Yes! You can freeze them after shaping but before the final rise. Thaw overnight in the refrigerator, let come to room temperature, then bake as directed.
Q: Why didn’t my pastries develop layers? A: This usually happens when the butter is too soft during lamination or the oven temperature is too low. Ensure your butter remains pliable yet firm, and ensure your oven is properly preheated.
Q: Can I use different types of chocolate? A: Definitely! Dark chocolate, milk chocolate, white chocolate, or even chocolate chips all work beautifully. Just adjust the quantity based on your preference.
Q: How do I know when they’re properly baked? A: They should be golden brown on top and bottom, and sound hollow when tapped. The layers should be clearly visible and separated.
Q: Can I make these without yeast? A: While possible, yeast contributes significantly to the flavor and texture. For a quicker version, you could use puff pastry, but it won’t have the same rich, bread-like quality.

Creating perfect chocolate pastries is just as much about the journey as it is about the destination. Each fold, each rise, each careful temperature check teaches you something new about the art of pastry making. The first time you bite into your homemade creation and hear that satisfying crunch followed by the rush of warm chocolate, you’ll understand why this ancient technique has captivated bakers for centuries.
So roll up your sleeves, embrace the process, and prepare to fill your kitchen with the most incredible aromas. Your family and friends are in for a real treat, and you’re about to discover just how rewarding the art of pastry making can be. Happy baking!
For more recipes, visit us!!!